Radiologist Guide
Table of Contents
Registration
Creating a workspace
Radiologists can create an ImaginNet workspace. The radiologist creating a workspace will act as the workspace administration. As an administrator, you have the privilege of setting prices for the services provided within your workspace and inviting other radiologists to join your team.
Here’s a step-by-step guide to help you get started:
- Go to www.imagingnet.com.
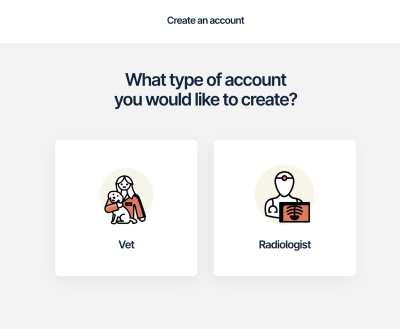
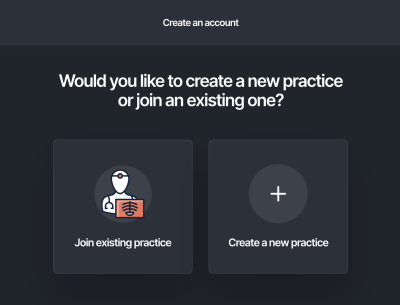
- Click on ‘Register,’ and then select ‘Radiologist.’ Choose ‘Create a New Practice.’
- You’ll be prompted to provide essential details:
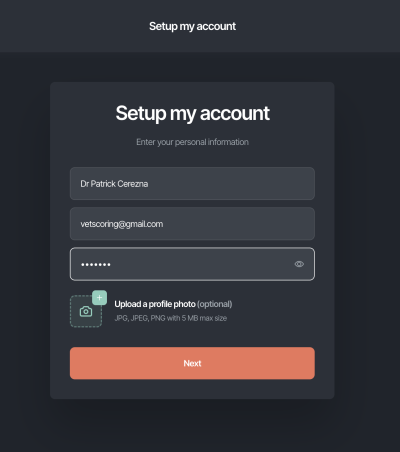
- Your name and email.
- Create a secure password.
- To set up your account effectively, you will need to provide the following information:
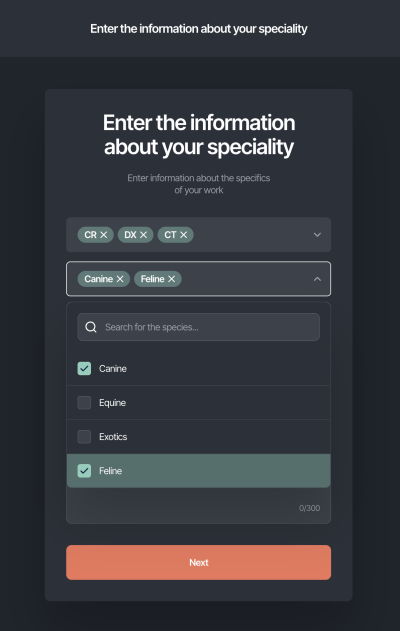
- Specify the modalities and animal species you are willing to report on.
- Include your colleague affiliations and a brief professional bio.
- Highlight your favourite modality and preferred body region.
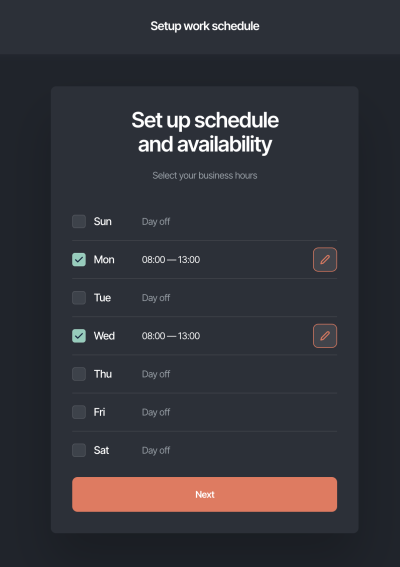
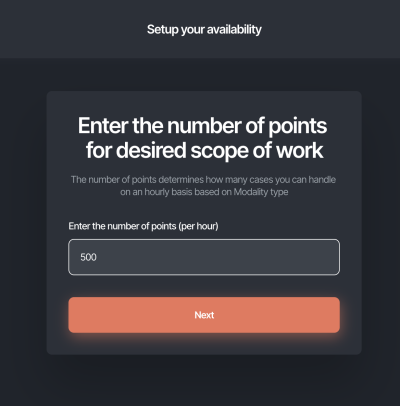
- Establish your availability schedule, indicating the number of points you plan to read per hour (more details provided below).
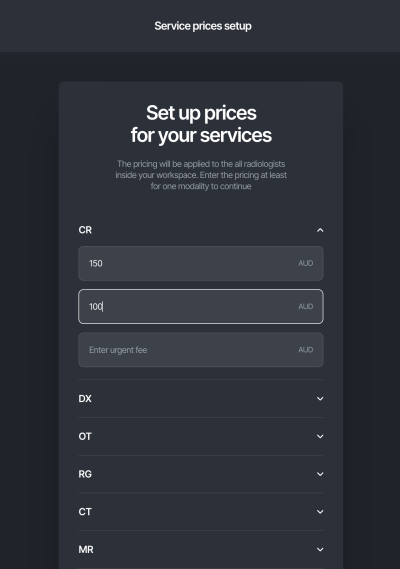
- Set the prices for various modalities offered in your practice.
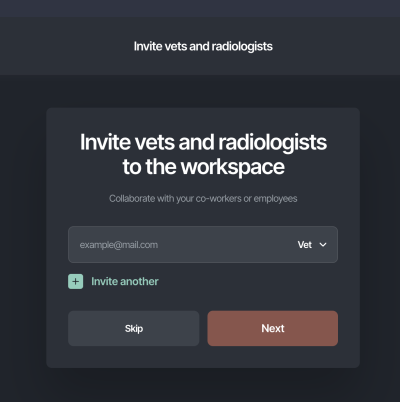
Additionally, you will have the opportunity to invite other veterinarians and radiologists to join your workspace, fostering collaboration and efficiency.
Select “Radiologist”
Select “Create a new practice”
Provide your name and email. Create a secure password.
Specify the modalities and animal species you are willing to report on
Set your availability schedule.
Indicating the number of points you plan to read per hour.
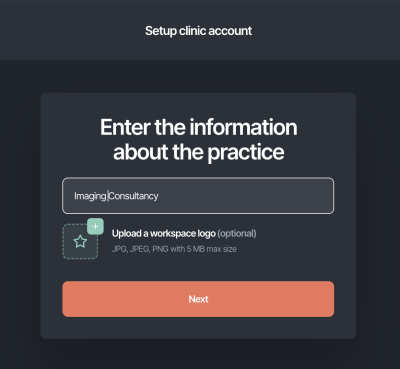
Provide your practice details
Set the prices for various modalities offered in your practice.
Invite other veterinarians and radiologists to join your workspace
Workspaces
Invite Radiologists and Referring Veterinarians to Your Workspace
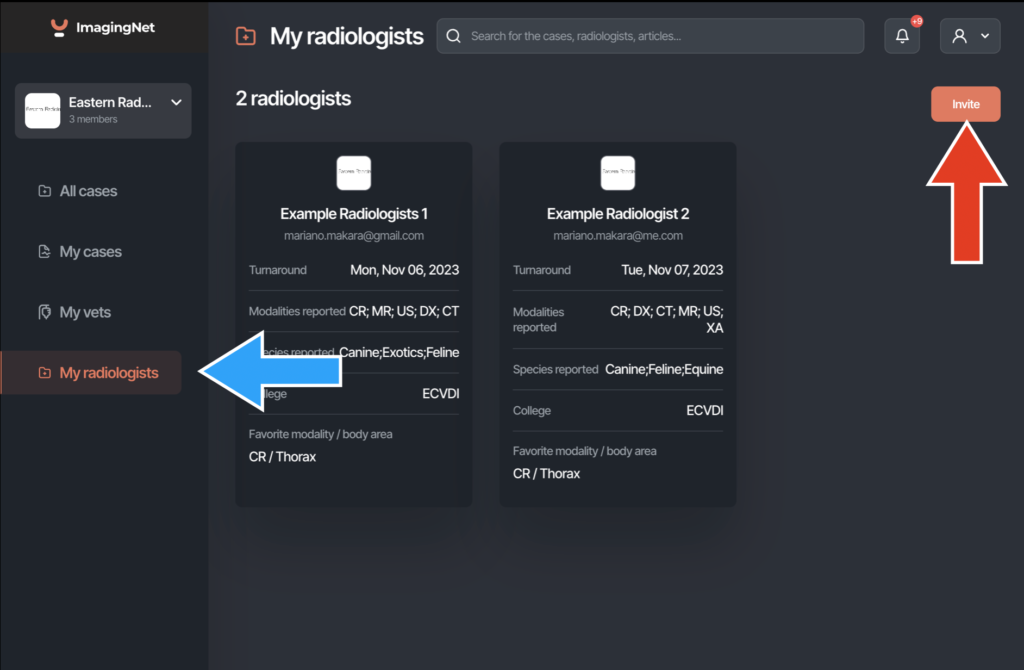
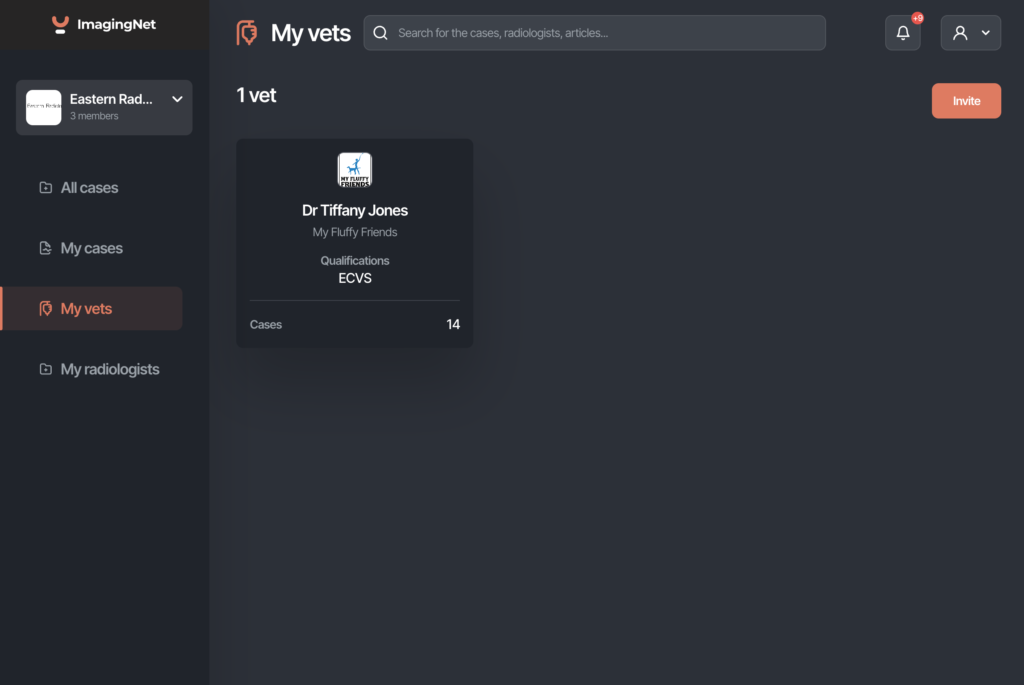
To invite radiologists or referring veterinarians to your workspace, follow these steps:
- Go to “My Radiologists” or “My Vets” in the side menu (blue arrow).
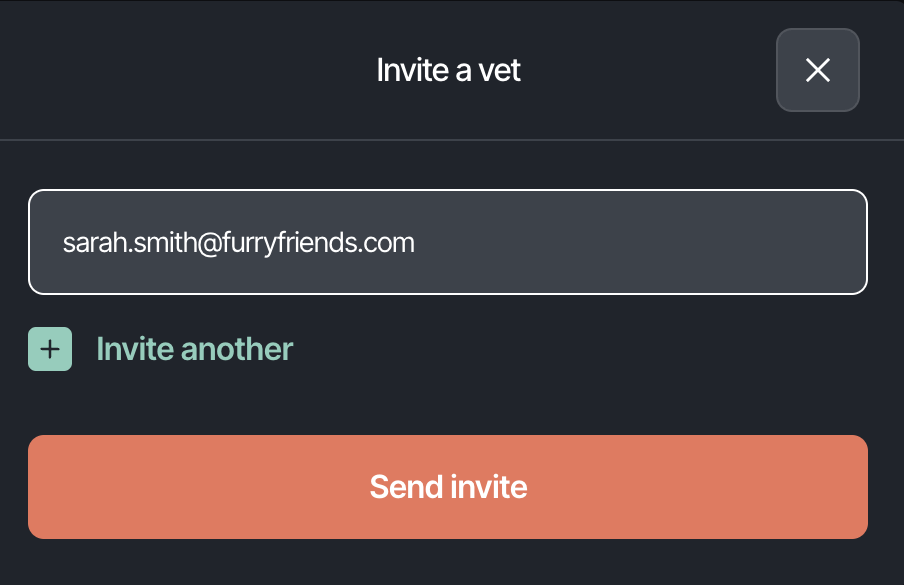
- Click on the “Invite” button located in the upper-right corner (red arrow).
- Enter the email address of the radiologist or referring veterinarian you wish to invite.
- ImagingNet will send an invitation email to the selected individual.
Invited Radiologist's Access
- Once they accept your invitation, radiologists will be asked to specify their preferred modalities and species for reporting.
- Additionally, they will be prompted to provide their availability schedule.
Referring Veterinarian's Access
- Referring veterinarians, upon receiving the invitation, will have access to:
- Details of radiologists within your workspace.
- Pricing information for the services offered.
- Referring veterinarians can also:
- Upload medical studies.
- Submit cases for further reporting.
Workspace Privacy
- Only radiologists and referring veterinarians who have received invitations will have access to your workspace.
- Radiologists can create their own workspaces, serve as administrators, and participate in multiple workspaces.
- Workspace administrators have the authority to set pricing for their practice, while invited radiologists can set their availability schedules.
- Radiologists can seamlessly switch between different workspaces within the application.
- Referring veterinarians can participate in multiple workspaces if invited by a radiologist administrator, allowing them to manage different practices conveniently.
Prices and Modalities/Species reported
Modality prices
- Workspace administrators can set prices for various modalities, including the price for one region and any additional regions.
- Administrators can also establish prices for urgent reports.
Instructions for Updating Modality Prices as a Workspace Administrator:
- As a workspace administrator, you will initially set the prices for various modalities while setting up the account.
- To update these prices later, follow these steps:
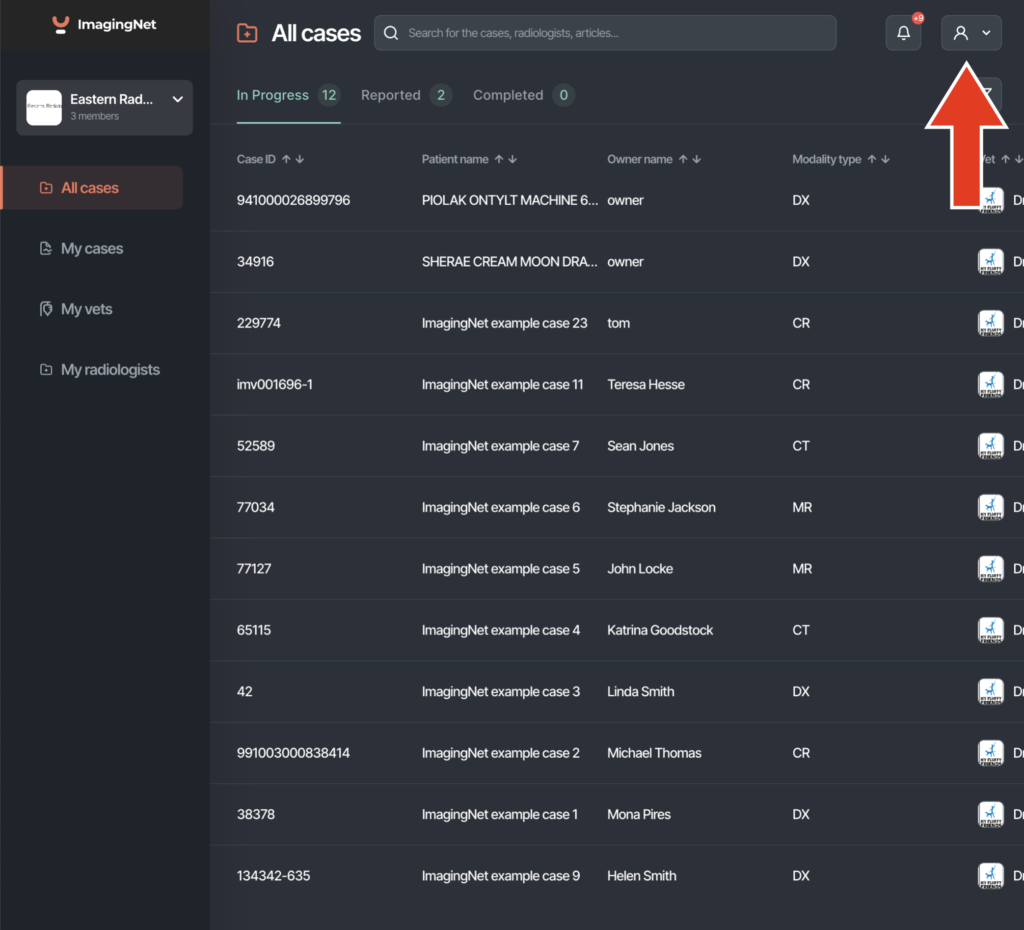
- In the upper-right corner, click on “User Account” (red arrow)
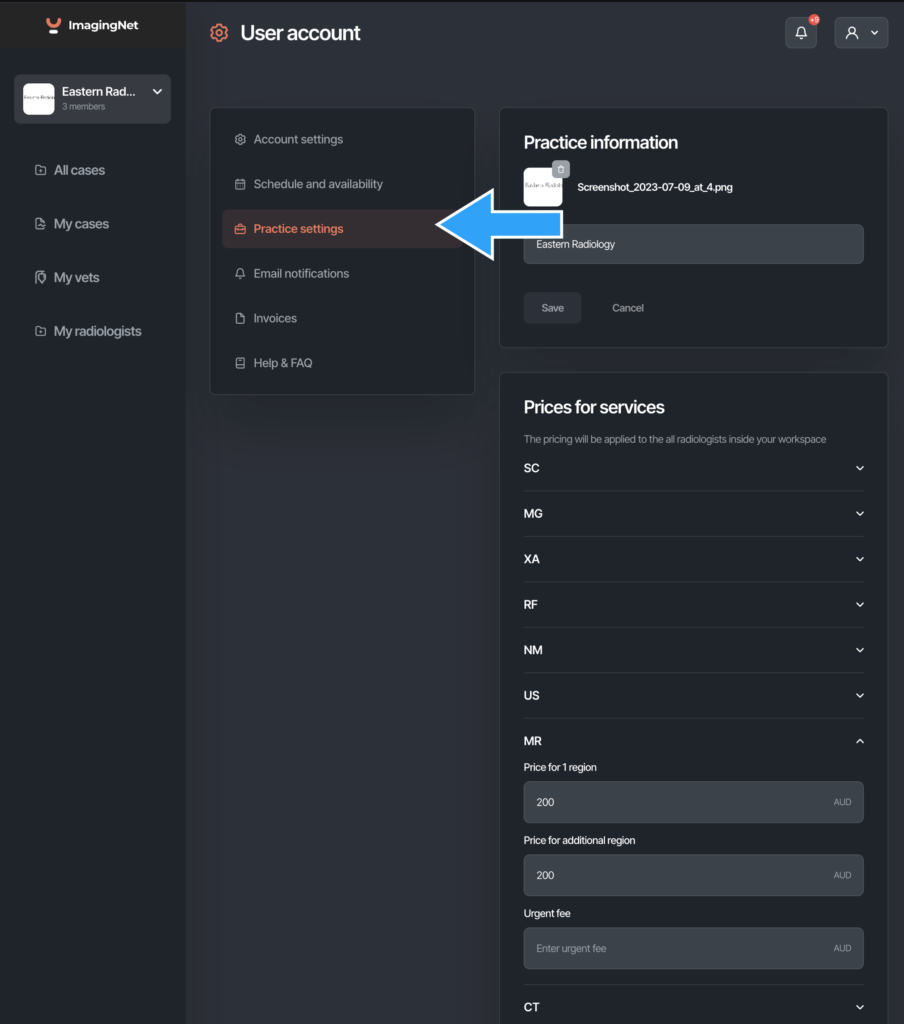
- Select “Practice Settings” from the User account options (blue arrow).
- Within the Practice Settings, you will see a list of imaging modalities.To update the prices for a specific modality, locate the arrowhead on the right side of that modality’s listing.
- Click on the arrowhead to expand the options and set the prices for:
- One region.
- Any additional regions.
- An urgent fee (if preferred).
Note: Leaving the urgent fee field blank will remove this option for this modality when referring veterinarians make requests.
Modalities and species reported
- Radiologists have the flexibility to select the modalities and species they prefer to report.
Instructions for Updating Modalities And Species Reported:
- As a workspace administrator, you will initially set the modalities and species you prefer to report on while setting up the account.
- When inviting other radiologists to your workspace, they will be prompted to include this information after receiving the email invitation.
- To update these preferences later, follow these steps:
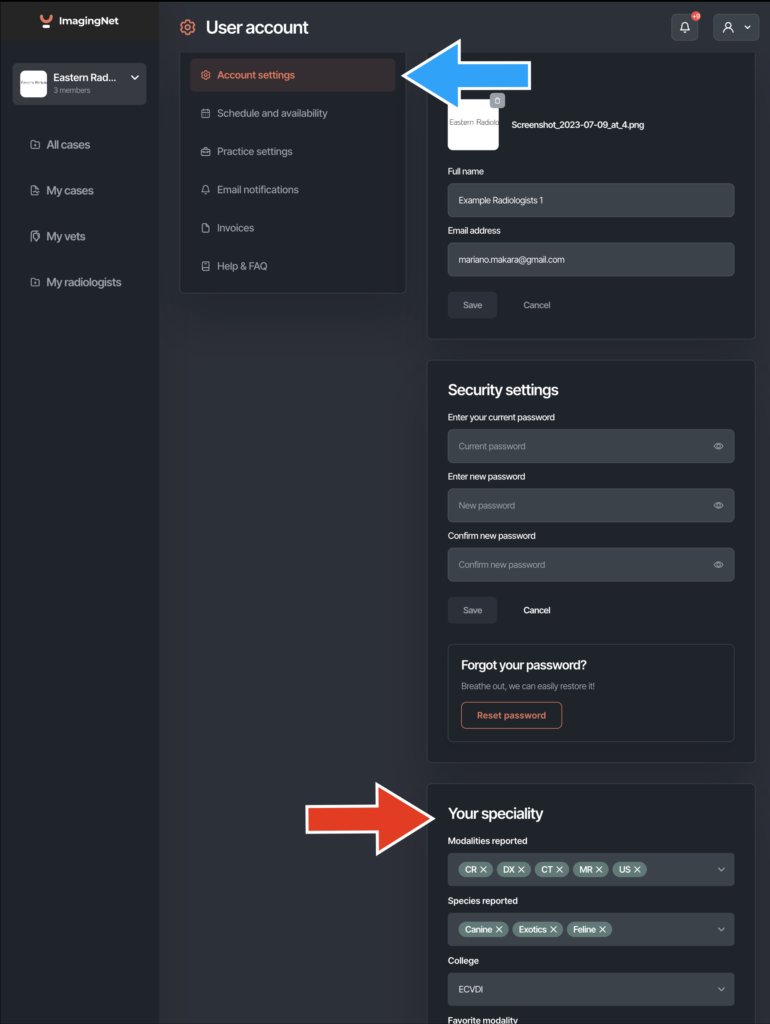
- In the upper-right corner, click on “User Account” (blue arrow).
- Select “Account Settings” from the User account options.
- Within the Account Settings, scroll down to “Your Speciality” (red arrow).
- Click on the arrowhead to expand the options.
- Set the modalities and species you prefer to report on.
Radiologist's availability and estimated turnaround time
Setting the radiologist's availability
- Radiologists in a workspace can define their preferred working days and hours.
- They can also specify the number of points allocated for reading studies per hour.
Instructions for Setting Your Schedule and Availability:
- As a workspace administrator, you will initially set your schedule and availability while setting up the account.
- When inviting other radiologists to your workspace, they will be prompted to include this information after receiving the email invitation.
- To update your schedule and availability preferences later, follow these steps:
- In the upper-right corner, click on “User Account.”
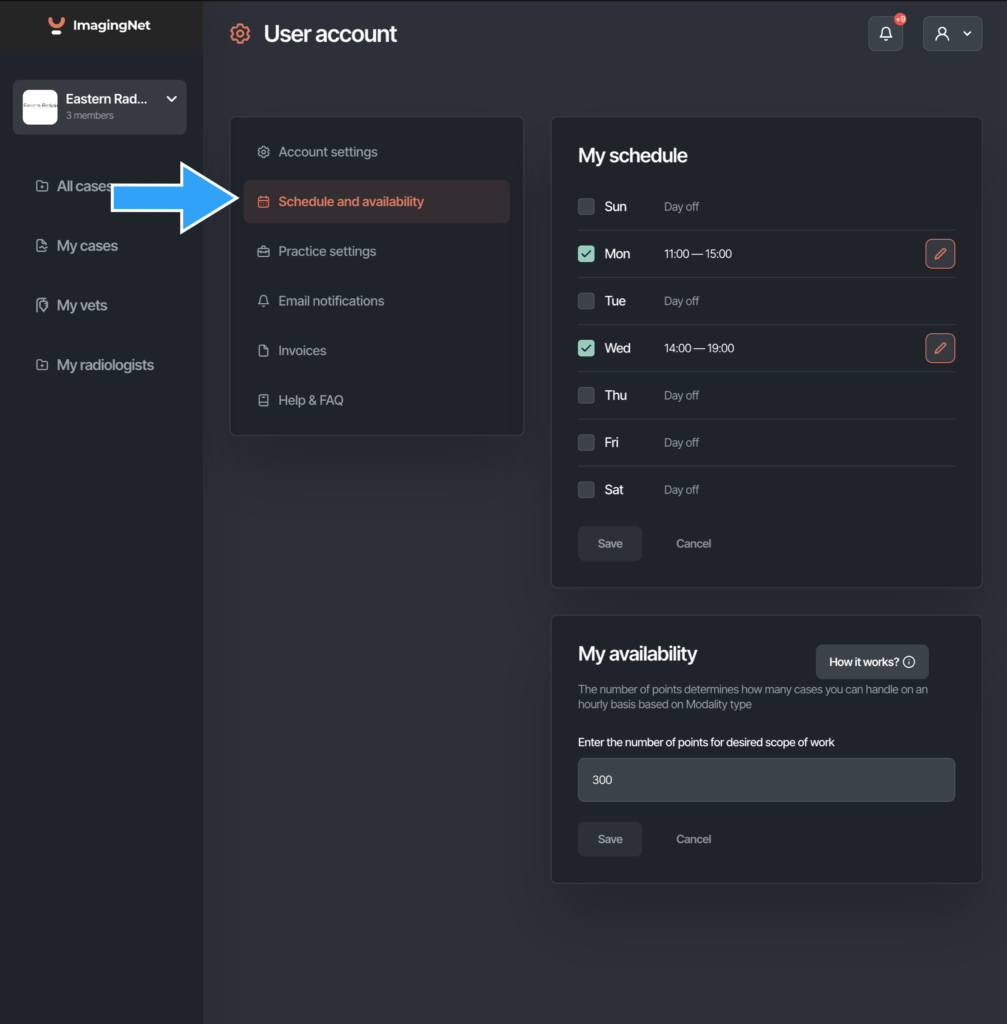
- Select “Schedule and Availability” from the User account options (blue arrow).
- Click on the specific day you would like to make yourself available.
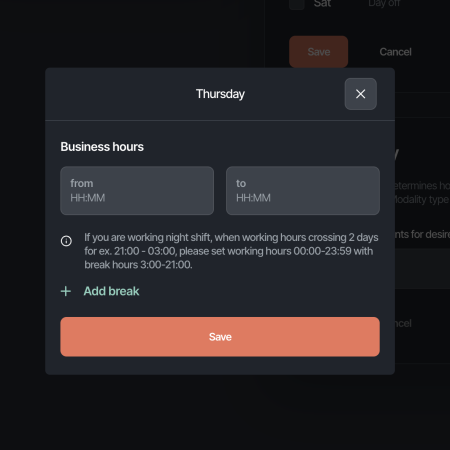
- If you want to make this day an ongoing working day, select the plus sign (+) icon. In the pop-up window, specify your business hours for that day and save your changes.
- If you would like to include a one-off availability for that day only, select the “Add One-off Availability” link. In the pop-up window, specify your business hours for that particular day and save your changes.
By following these instructions, you can easily manage your schedule and availability, whether it’s for ongoing working days or one-off availability.
Point System
- The point system assigns numerical values based on the estimated time required for a single-region report in each modality.
- For example, ImagingNet assigns 150 points for a single-region radiographic study, 250 for a single-region CT, and 300 for an MRI.
- Radiologists can indicate the number of points they are willing to work during each working hour.
- When a radiologist receives a case, the corresponding points are deducted from their total.
- If all points for the day are utilized, the application will automatically update the turnaround time to the next scheduled working day.
Instructions for Updating Hourly Reading Points:
- In the upper-right corner, click on “User Account.”
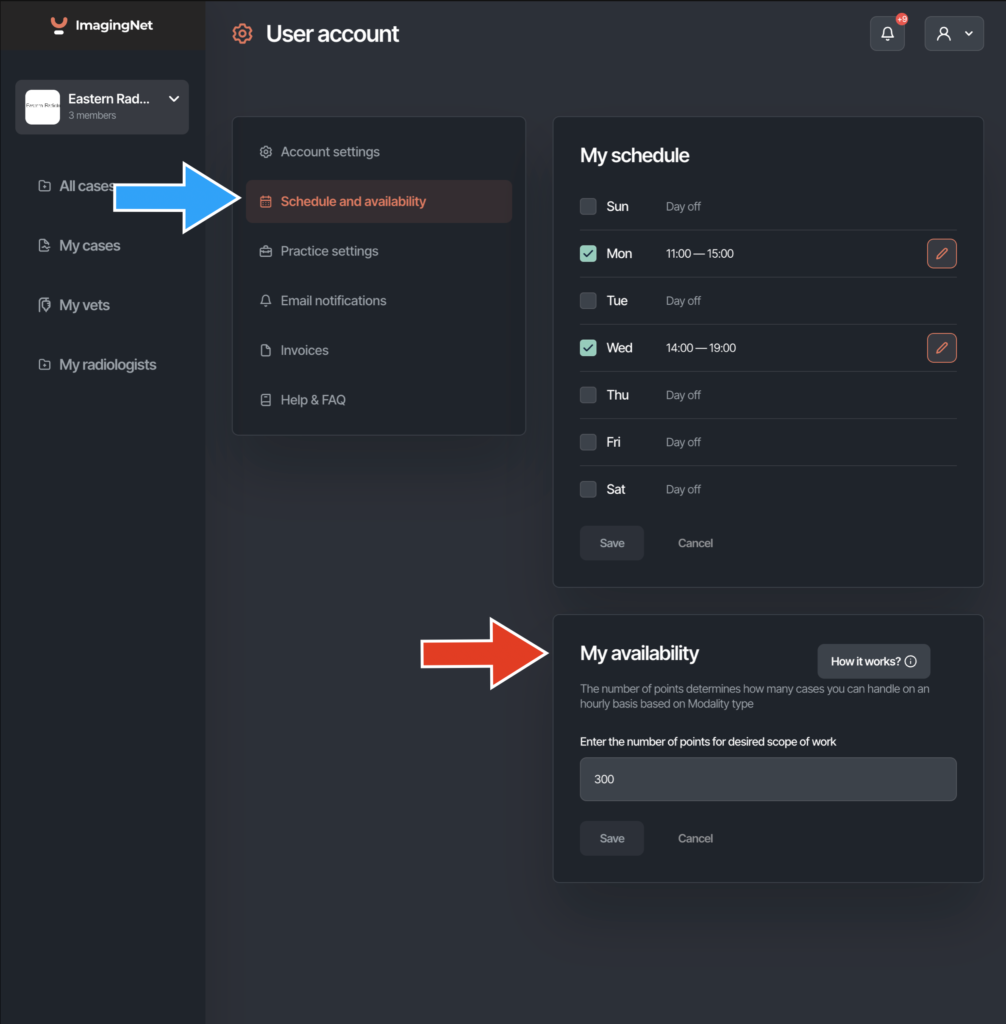
- Select “Schedule and Availability” from the User account options.
- Scroll down to the section labelled “My Availability” (red arrow).
- Enter the desired number of points and save your changes.
By following these steps, you can easily update your hourly reading points to align with your preferences and workload capacity.
Turnaround Time Estimation
- ImagingNet automatically estimates the turnaround time for each radiologist based on:
- The radiologist’s schedule and availability.
- The number of points per hour allocated by each radiologist.
- User time zones.
- The number of studies already received.
- These estimations are continuously updated to provide accurate and up-to-date information to referring veterinarians.
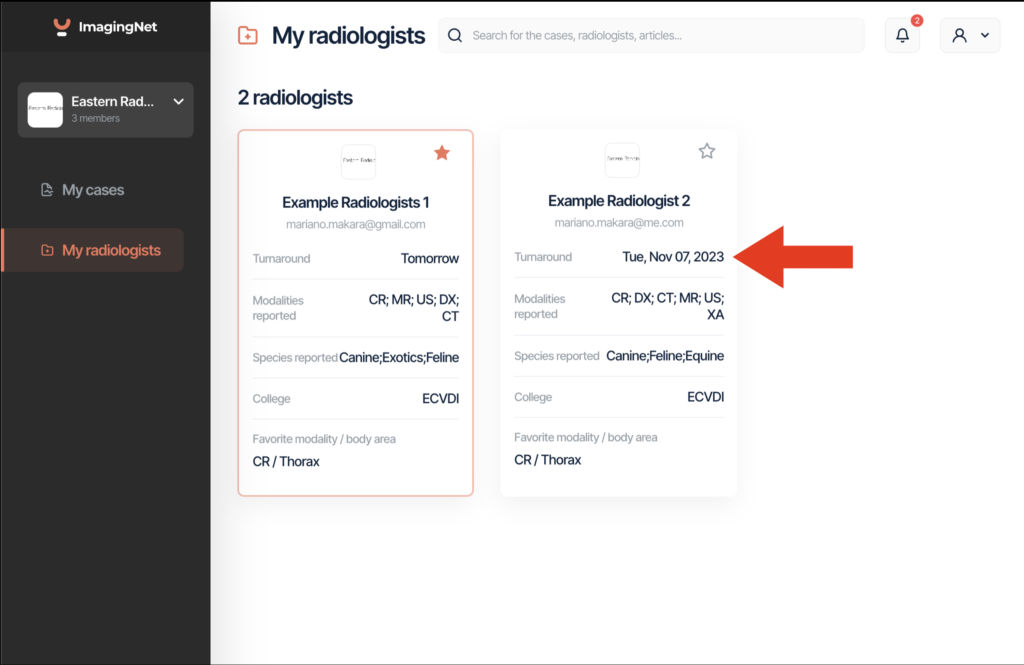
Turnaround time overview as it appears to referring veterinarians: The first line displays the current turnaround time for each radiologist (red arrow), providing vital information to referring veterinarians at a glance.
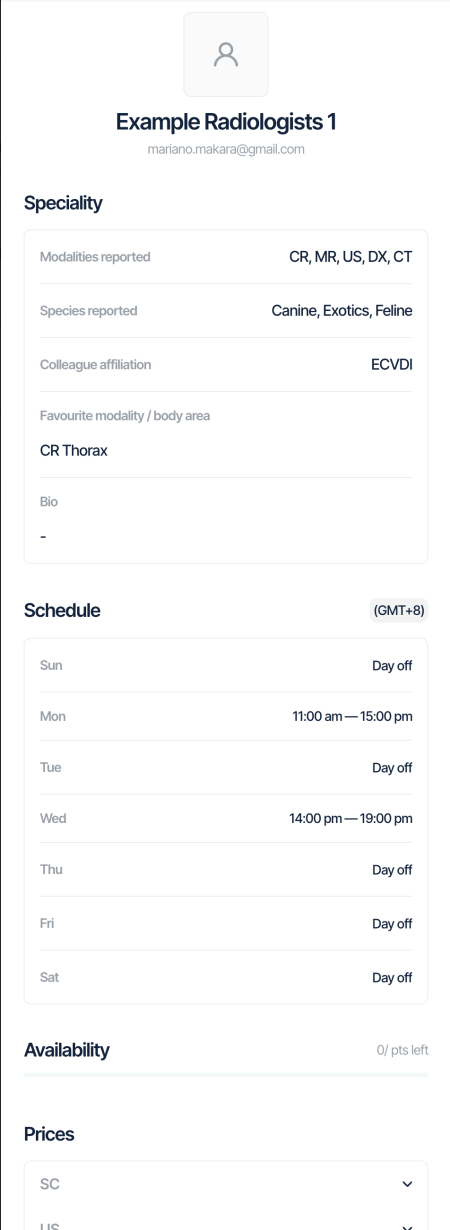
Detailed Schedule: By clicking on a radiologist’s card, referring veterinarians can access a detailed schedule for each radiologist, allowing for a more in-depth view of their availability and workload.
Report
Write or Upload a report
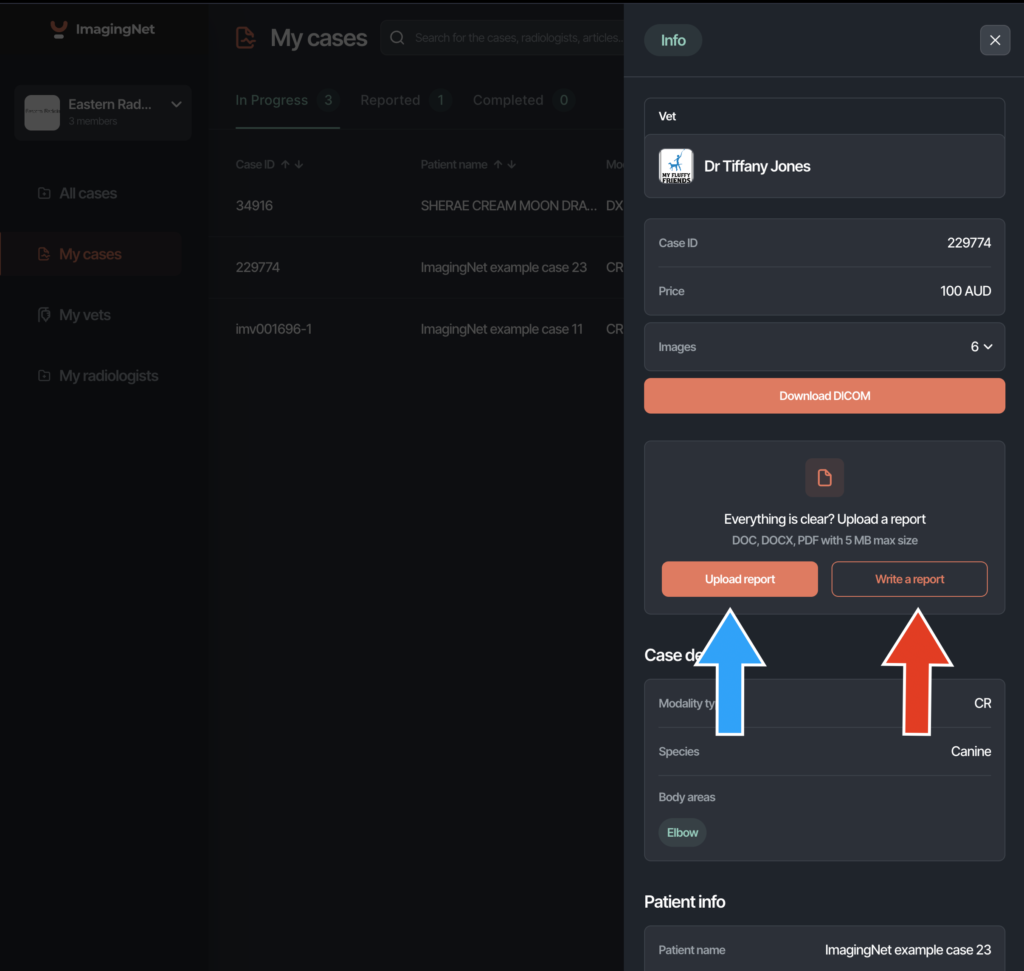
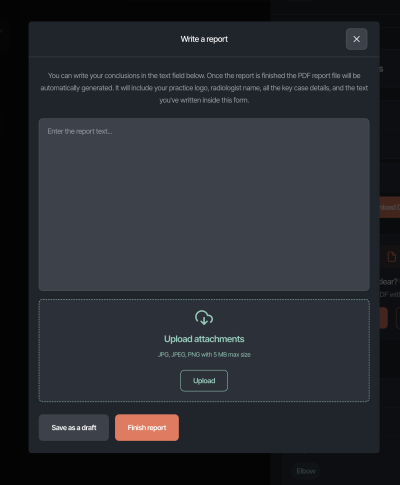
- Radiologists can upload reports in various formats or create them directly on the platform.
- Key images can be uploaded to enhance and complement the report, providing comprehensive information.
- Radiologists have the flexibility to save a preliminary report for future editing.
- Once the report is finalized, clicking on ‘Finish report’ will automatically send it to the referring veterinarian, and the case is moved to the ‘Reported’ column.
Instructions to Generate a Report:
- Select “My Cases” from the side menu.
- Choose the specific case you wish to report on.
- A pop-up window will appear, displaying the case details.
- If you have a report already written in a format like Word that you want to upload, click on “Upload Report” (blue arrow), and then select the file from your computer.
- Alternatively, if you prefer to write the report directly within ImagingNet, click on “Write a Report” (red arrow). A new window will pop up, allowing you to type the report. You can also conveniently drag and drop key images that you wish to share with the referring veterinarian.
